Friday, March 18, 2011

fresh muffins every day for a month? yes you can!


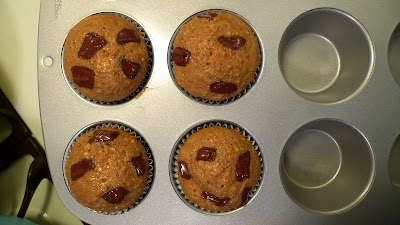
and they are healthy too! on my most recent trip to london, my friend jon made these muffins. when he told me that he could keep the batter in the fridge up to 30 days and make a fresh muffin whenever he wanted--- i was determined to make these for myself as soon as i got home!


basic recipe:
1/2 cup veg oil
2 eggs
1 cup wheat flour
2 cups digestive bran
1 tsp salt
1 1/4 cups flour
1 1/2 cups brown sugar
2 cups milk
1 tsp vanilla
2 tsp baking soda
1/2 cup of oats
a sprinkle of mixed spices (cinnamon, nutmeg, etc... up to you)


*mix oil, sugar and eggs until mixed.
*add remaining ingredients and mix well.
*you can also add honey, banana, dried fruit, raisins or nuts now-- or add things in with each new baking session. I decided to do the latter, so i could make different muffins every time
*allow to stand overnight in refrigerator, sealed in a plastic container.

when ready to bake:
*oven to 375F
*spoon in to greased muffin tin, filling each compartment to the top.
*bake for 12-15 minutes, until toothpick inserted comes out clean.

*this batter will keep in the refrigerator up to 30 days before baking--- make sure the container is tightly sealed.

i decided to do 6 muffins at a time, and a different mix in with every batch. these are the muffins i made:

30 day muffin mix with cranberries and honey


30 day muffin mix with banana, honey and oats on top.


30 day muffin mix with banana, oats and dark chocolate on top.

Wednesday, February 16, 2011

pre-valentine's day treats


the weekend before valentine's day two of my favorite ladies had a double birthday. i didn't want to do anything with icing, because 1) i wanted to do something different 2) making sure your icing stays in tact on a jerky A train is no fun.

i wanted something rich and with chocolate, because one of the ladies in question is a major chocolate fiend. hey... can you blame her? she sleeps with a rifle under her bed, so i wasn't going to disappoint.

i turned again to smitten kitchen (the bible of baking blogs to be honest), for something easy to carry on the train AND muy deliciouso.

peanut butter and chocolate rice krispie bars

for this recipe i bought my first candy thermometer--- a very exciting purchase indeed. i plan to make lots of other candy treats with the aide of this device.

adapted from smitten kitchen:

(bottom) rice krispie crust:
1 3/4 cups crisped rice cereal
1/4 cup sugar
3 tablespoons light corn syrup
3 tablespoons salted butter- melted

(middle) milk chocolate peanut butter layer:
5 ounces semi-sweet chocolate chips
1 cup creamy peanut butter

(top) the chocolate icing:
3 ounces dark chocolate (60 to 72 percent cocoa) chips (thanks sahadis!)
1/2 teaspoon light corn syrup
4 tablespoons (1/2 stick or 2 ounces) salted butter

lightly grease the pan

rice krispie layer:
put the cereal in a large bowl and set aside.

pour 1/4 cup water into a small saucepan.
gently add the sugar and corn syrup and use a small wooden spoon to stir the mixture until just combined.
put a candy thermometer in the saucepan.
cook over medium-high heat and bring to a boil; cook until the mixture reaches the soft ball stage, 235 degrees F.

remove from the heat, stir in the butter, and pour the mixture over the cereal.
working quickly, stir until the cereal is thoroughly coated, then pour it into the prepared pan.
using your hands, press the mixture into the bottom of the pan (do not press up the sides).
put aside- let the crust cool to room temperature while you make the next layer.

the milk chocolate peanut butter layer:
in a large nonreactive metal bowl, stir together the chocolate and the peanut butter.
set the bowl over a saucepan of simmering water and cook, stirring with a rubber spatula, until the mixture is smooth.
remove the bowl from the pan and stir for about 30 seconds to cool slightly.
pour the mixture over the cooled crust.
put the pan in the refrigerator for 1 hour, or until the top layer hardens.

the chocolate icing:
in a large nonreactive metal bowl, combine the chocolate, corn syrup, and butter.

set the bowl over a saucepan of simmering water and cook, stirring with a rubber spatula, until the mixture is completely smooth and shiny.
remove the bowl from the pan and stir for 30 seconds to cool slightly.
pour the mixture over the chilled milk chocolate peanut butter layer and spread (actually, I found it easier to just roll it around until it coated smoothly, avoiding the risk of picking up any of the peanut butter layer with it) into an even layer.
put the pan into the refrigerator for 1 hour, or until the topping hardens.

cut into squares and serve. WARNING: try not to eat them all before presenting them to the birthday girls.

i followed the recipe exactly. they turned out delicious--- except, i think i wanted more of a rice krispie layer. next time, i am going to double the krispie crust layer.

i put a few aside for boyfriend (it was verrryyyyy appreciated) and a few aside for our red lobster double date buddies for the next night (micah and jenn). these treats and red lobster all in one weekend?? yes... i did.

matcha filled oreos!


the month of matcha continues! for the next round, i wanted to make something with chocolate. i once had green tea ice cream with chocolate and it was delicious. since i had been wanting to make these smitten kitchen oreos again, i thought i could just add some matcha to the filling. they looked kinda funny (bright green filling) but they tasted divine. they were on the tea trolley in the morning and gone by the afternoon.

follow the recipe on smitten kitchen, and add 1-2 tablespoons of matcha (based on your preference). this was a pretty easy recipe. homemade oreos are BEYOND delish :)

Tuesday, January 18, 2011

half japanese cake... kickin' off a month of matcha!


hello fellow sweet lovers. for the next month i am going to attempt to bake lots of delicious things with matcha! my parents brought me some all the way from japan and now that it's opened, i have to take full advantage of the delicious green goodness.

i wanted to make something seriously yummy in honor of my (former) co-worker pammie, she had her last day a week ago. she is someone who enjoys more non traditional dessert, and i thought something with matcha would be right up her ally. also- we have an (oh so amazing) tea trolley we set up in our little communications den at work. i wanted something that would go well with tea. i looked for many desserts with matcha before i made my decision. the amount of butter in this cake would make paula deen very proud ya'll!

lemon and matcha marble pound cake
adapted from joy the baker

makes 2 cakes

4 cups flour (sifted)
3 3/4 tsp baking powder
3/8 tsp salt
3 1/2 cups sugar
1 1/2 tsp vanilla
9 eggs
1 cup sour cream
juice of one lemon, zest of 2
1 1/2 tbsp MATCHA powder
3 sticks (minus 1 tablespoon - put that aside for greasing the pans) of unsalted butter melted

*set oven to 350ยบ F

*sift together flour, salt, baking powder in a bowl and set aside

*wisk eggs and sugar until well mixed. mix in vanilla, then sour cream. mix on a slow speed until well blended

*melt the butter and put aside

*very slowly mix the flour mixture into the egg/sugar/sour cream mixture

*mix in butter slowly. make sure the batter is very mixed.

*split the batter into two bowls.

*add lemon juice and zest to one bowl. add matcha to the other.

*layer (4 layers- 2 of each batter) the batter in 2 pans that have been greased and dusted with flour. one layer of lemon on the bottom, one layer of matcha on that, one layer of lemon on that, one more of matcha on top. take a knife, put it all the way to the bottom, and make a swirl pattern.

*cook for 1 hour


*let the cake sit before removing from pan.

this cake is delicious with a small spread of lemon curd. but really, it's delicious on its own.


this cake was lovely. it's beautiful to look at and tastes divine! go matcha go!