Friday, March 18, 2011
fresh muffins every day for a month? yes you can!
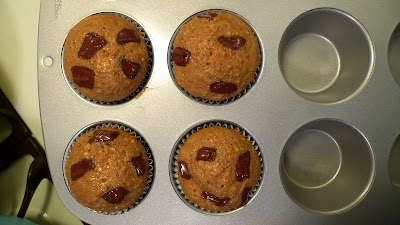
and they are healthy too! on my most recent trip to london, my friend jon made these muffins. when he told me that he could keep the batter in the fridge up to 30 days and make a fresh muffin whenever he wanted--- i was determined to make these for myself as soon as i got home!
basic recipe:
1/2 cup veg oil
2 eggs
1 cup wheat flour
2 cups digestive bran
1 tsp salt
1 1/4 cups flour
1 1/2 cups brown sugar
2 cups milk
1 tsp vanilla
2 tsp baking soda
1/2 cup of oats
a sprinkle of mixed spices (cinnamon, nutmeg, etc... up to you)
*mix oil, sugar and eggs until mixed.
*add remaining ingredients and mix well.
*you can also add honey, banana, dried fruit, raisins or nuts now-- or add things in with each new baking session. I decided to do the latter, so i could make different muffins every time
*allow to stand overnight in refrigerator, sealed in a plastic container.
when ready to bake:
*oven to 375F
*spoon in to greased muffin tin, filling each compartment to the top.
*bake for 12-15 minutes, until toothpick inserted comes out clean.
*this batter will keep in the refrigerator up to 30 days before baking--- make sure the container is tightly sealed.
i decided to do 6 muffins at a time, and a different mix in with every batch. these are the muffins i made:
30 day muffin mix with cranberries and honey
30 day muffin mix with banana, honey and oats on top.
30 day muffin mix with banana, oats and dark chocolate on top.
Wednesday, February 16, 2011
pre-valentine's day treats
the weekend before valentine's day two of my favorite ladies had a double birthday. i didn't want to do anything with icing, because 1) i wanted to do something different 2) making sure your icing stays in tact on a jerky A train is no fun.
i wanted something rich and with chocolate, because one of the ladies in question is a major chocolate fiend. hey... can you blame her? she sleeps with a rifle under her bed, so i wasn't going to disappoint.
i turned again to smitten kitchen (the bible of baking blogs to be honest), for something easy to carry on the train AND muy deliciouso.
peanut butter and chocolate rice krispie bars
for this recipe i bought my first candy thermometer--- a very exciting purchase indeed. i plan to make lots of other candy treats with the aide of this device.
adapted from smitten kitchen:
(bottom) rice krispie crust:
1 3/4 cups crisped rice cereal
1/4 cup sugar
3 tablespoons light corn syrup
3 tablespoons salted butter- melted
(middle) milk chocolate peanut butter layer:
5 ounces semi-sweet chocolate chips
1 cup creamy peanut butter
(top) the chocolate icing:
3 ounces dark chocolate (60 to 72 percent cocoa) chips (thanks sahadis!)
1/2 teaspoon light corn syrup
4 tablespoons (1/2 stick or 2 ounces) salted butter
lightly grease the pan
rice krispie layer:
put the cereal in a large bowl and set aside.
pour 1/4 cup water into a small saucepan.
gently add the sugar and corn syrup and use a small wooden spoon to stir the mixture until just combined.
put a candy thermometer in the saucepan.
cook over medium-high heat and bring to a boil; cook until the mixture reaches the soft ball stage, 235 degrees F.
remove from the heat, stir in the butter, and pour the mixture over the cereal.
working quickly, stir until the cereal is thoroughly coated, then pour it into the prepared pan.
using your hands, press the mixture into the bottom of the pan (do not press up the sides).
put aside- let the crust cool to room temperature while you make the next layer.
the milk chocolate peanut butter layer:
in a large nonreactive metal bowl, stir together the chocolate and the peanut butter.
set the bowl over a saucepan of simmering water and cook, stirring with a rubber spatula, until the mixture is smooth.
remove the bowl from the pan and stir for about 30 seconds to cool slightly.
pour the mixture over the cooled crust.
put the pan in the refrigerator for 1 hour, or until the top layer hardens.
the chocolate icing:
in a large nonreactive metal bowl, combine the chocolate, corn syrup, and butter.
set the bowl over a saucepan of simmering water and cook, stirring with a rubber spatula, until the mixture is completely smooth and shiny.
remove the bowl from the pan and stir for 30 seconds to cool slightly.
pour the mixture over the chilled milk chocolate peanut butter layer and spread (actually, I found it easier to just roll it around until it coated smoothly, avoiding the risk of picking up any of the peanut butter layer with it) into an even layer.
put the pan into the refrigerator for 1 hour, or until the topping hardens.
cut into squares and serve. WARNING: try not to eat them all before presenting them to the birthday girls.
i followed the recipe exactly. they turned out delicious--- except, i think i wanted more of a rice krispie layer. next time, i am going to double the krispie crust layer.
i put a few aside for boyfriend (it was verrryyyyy appreciated) and a few aside for our red lobster double date buddies for the next night (micah and jenn). these treats and red lobster all in one weekend?? yes... i did.
matcha filled oreos!
the month of matcha continues! for the next round, i wanted to make something with chocolate. i once had green tea ice cream with chocolate and it was delicious. since i had been wanting to make these smitten kitchen oreos again, i thought i could just add some matcha to the filling. they looked kinda funny (bright green filling) but they tasted divine. they were on the tea trolley in the morning and gone by the afternoon.
follow the recipe on smitten kitchen, and add 1-2 tablespoons of matcha (based on your preference). this was a pretty easy recipe. homemade oreos are BEYOND delish :)
Tuesday, January 18, 2011
half japanese cake... kickin' off a month of matcha!
hello fellow sweet lovers. for the next month i am going to attempt to bake lots of delicious things with matcha! my parents brought me some all the way from japan and now that it's opened, i have to take full advantage of the delicious green goodness.
i wanted to make something seriously yummy in honor of my (former) co-worker pammie, she had her last day a week ago. she is someone who enjoys more non traditional dessert, and i thought something with matcha would be right up her ally. also- we have an (oh so amazing) tea trolley we set up in our little communications den at work. i wanted something that would go well with tea. i looked for many desserts with matcha before i made my decision. the amount of butter in this cake would make paula deen very proud ya'll!
lemon and matcha marble pound cake
adapted from joy the baker
makes 2 cakes
4 cups flour (sifted)
3 3/4 tsp baking powder
3/8 tsp salt
3 1/2 cups sugar
1 1/2 tsp vanilla
9 eggs
1 cup sour cream
juice of one lemon, zest of 2
1 1/2 tbsp MATCHA powder
3 sticks (minus 1 tablespoon - put that aside for greasing the pans) of unsalted butter melted
*set oven to 350ยบ F
*sift together flour, salt, baking powder in a bowl and set aside
*wisk eggs and sugar until well mixed. mix in vanilla, then sour cream. mix on a slow speed until well blended
*melt the butter and put aside
*very slowly mix the flour mixture into the egg/sugar/sour cream mixture
*mix in butter slowly. make sure the batter is very mixed.
*split the batter into two bowls.
*add lemon juice and zest to one bowl. add matcha to the other.
*layer (4 layers- 2 of each batter) the batter in 2 pans that have been greased and dusted with flour. one layer of lemon on the bottom, one layer of matcha on that, one layer of lemon on that, one more of matcha on top. take a knife, put it all the way to the bottom, and make a swirl pattern.
*cook for 1 hour
*let the cake sit before removing from pan.
this cake is delicious with a small spread of lemon curd. but really, it's delicious on its own.
this cake was lovely. it's beautiful to look at and tastes divine! go matcha go!
Thursday, December 30, 2010
christmukkah cookies for all!
every year i bake cookies for all the men that work in my building. this year i even invested in really pretty cookie packaging from my new favorite spot in brooklyn - paper source.
i wanted to have a variety of cookies, but also wanted cookies that could all be done for all eight recipients in 2 nights (at most). i wanted to make sure i got everyone fresh cookies-- it makes all the difference. i also had to find a good vegan recipe. two of the lucky cookie recipients are vegans- and they both happen to be the nicest guys in the building.
my friend pam recently made these delicious cookies that she mentioned were vegan. they were so rich with chocolate and spicy too. i knew they were the right choice. i gave the extras to my boyfriend and some visitors i had in from baltimore. i mentioned the cookies were vegan and my cookie fans were shocked!
spicy mexican hot chocolate cookies for vegans (and non vegans too)
ingredients:
cookies:
1/2 cup canola oil
1 cup sugar
1/4 cup pure maple syrup
3 tablespoons almond milk
2 tsp vanilla extract
1 2/3 cups flour
1/2 cup unsweetened cocoa powder
1 tsp baking soda
1/4 tsp salt
1/2 tsp cinnamon
1/2 tsp cayenne
topping:
coarse sugar
cinnamon
instructions:
*oven to 350 F.
*mix the topping ingredients together on a flat plate. set aside.
*mix together oil, sugar, syrup, and milk. mix in vanilla.
*sift in remaining ingredients, stirring as you add them. once all ingredients are added mix until you’ve got a pliable dough.
*roll dough into walnut sized balls. pat into the sugar topping to flatten slightly (not too flat). transfer to baking sheet, sugar side up, at least 2 inches apart (they do spread).
*bake for 10 to 12 minutes
so- the vegans were taken care of, now what about the other nice guys in my building? i decided to use one sugar cookie dough recipe (which i doubled) to make three different types of cookies. thumbprints with jam, nutella sandwiches with sugar on top, and lemon iced cookies (lemon icing recipe further down). they were all sooooooo delicious. i also had a lot of help from my awesome chef's assistant / boyfriend.
the best simple sugar cookie dough:
ingredients:
2 1/2 cups flour, plus more for the work surface
1/4 tsp baking soda
1/4 tsp kosher salt
1 cup unsalted butter (at room temperature)
3/4 cup granulated sugar
1 large egg
1 tsp vanilla
1 tsp maple syrup
instructions:
*oven to 350° F.
*in a large bowl, whisk together the flour, baking soda, and salt.
*using an electric mixer, beat the butter and sugar until smooth. add the egg and beat until fluffy, about 2 minutes. beat in the vanilla.
*reduce the mixer speed to low and gradually add the flour mixture, mixing until just incorporated (the dough will be stiff). shape into a disk. wrap in plastic wrap and refrigerate until firm, at least 1 hour.
*on a floured surface, roll the dough to ¼ inch thick. using cookie cutters, cut into shapes. place on parchment-lined baking sheets, spacing them 1½ inches apart.
*bake 10 to 12 min
lemon icing:
juice of half a lemon
lemon zest
1 cup of confectioner sugar
few spoonfuls of water
wisk till smooth.
when cookies are cool, dip in icing.
let dry a bit. dip one more time.
sprinkle with sanding sugar.
put in fridge for 30 minutes.
serve cookies at room temp.
these are the cookies ready to go! happy holidays everyone.
xo
Saturday, December 25, 2010
BAKE OFF!
i have been baking quite a bit in the last month! the holidays have been busy and it seems i have been neglecting the blog. so many recipes to share, so many sweet tales to tell.
to start off, please meet the new love of my baking life:
so. in. love. hanukkah harry is a good man!
about a month ago my lovely co-workers and i decided to have a bake off. there are a lot of skilled bakers in my office, so it was getting pretty competitive. lots of shit talking, lots of planning, but all in good fun. we even put out an email to the whole office to recruit judges. the bake off dessert had to have an autumn theme. this is what i made:
PUMPKIN CUPCAKES. BUTTERSCOTCH CHIPS. VANILLA CREAM CHEESE FROSTING. YUM!
I used this recipe for the pumpkin cupcakes, but also added a pinch of cloves, a pinch of black pepper, and a teaspoon of maple syrup. I also added butterscotch chips, folding them in before spooning out the batter into the liners.
i made vanilla cream cheese frosting. it's easy and delicious to make this from scratch. the key is to have your cream cheese and butter very soft at room temp. also, sifting the sugar helps keep the icing light and smooth. with an icing this simple, these factors will make a large impact. i also like to add the contents of one vanilla bean.
VANILLA CREAM CHEESE FROSTING
1 package of full fat cream cheese (8 oz)
1 stick unsalted butter
2-3 cups powdered sugar (i lean closer to 2 cups as the cupcakes were pretty sweet)
1 teaspoon of vanilla extract
1 vanilla bean (the seeds only, not the pod)
A TIP: save the vanilla bean pods- put them in a jar with some white sugar and shake it up. in a day or so you have homemade vanilla sugar. vanilla sugar makes a cup of pg tips with milk even more delicious!
the cupcakes were a big hit! although i didn't win first prize, i was a close second. i did hold the title for 2 years, so it's only fair someone else get the glory for a short while... i let them know, i am ready for a rematch!
Sunday, November 14, 2010
cake balls, brooklyn's best and vintage tins!
one of my favorite west coast ladies got married this summer. i sadly could not attend the wedding. as a little post wedding treat, i sent a care package. other than the horrible experience of waiting in line at the post office (a fate worse than death), it was so much fun to assemble this package. it included homemade banana cake balls, mast bros chocolate, a baked brownie, brooklyn gum, 1" story pin, goucher college sticker (it's where we met after all), john waters postcard and cards from atomic books--- i put it all in a vintage 50's tin from holland. i love vintage tins, and to find one in such beautiful condition was divine!
cake balls are something i rediscovered recently. they are always a BIG hit at the office. making cake balls can be a bit messy, but they are pretty easy to make otherwise. i recently starting thinking about all the flavor combos that could be made... and one that i needed to try was banana cake with cream cheese frosting and dark chocolate. i followed bakarella's 'instructions' while incorporating different flavor cake. i also put a single sugar pearl on each cake ball, which i thought was a romantic touch.
so much deliciousness being sent with love from east to west <3
Subscribe to:
Posts (Atom)